- QUV
- The QUV weathering tester is fast and economical. Fluorescent UV lamps provide the best simulation of solar UV. However, the QUV lacks the longer wavelengths necessary for testing certain materials.
- Short-wave UV: The QUV tester provides the best possible simulation of sunlight in the short-wave UV region, making it ideal for testing durable materials such as coatings, roofing and plastics. Its fluorescent UV lamps are spectrally stable, enhancing reproducibility and repeatability.
- Condensation: The QUV tester's condensation system (100% RH) is the most realistic acceleration of outdoor moisture attack. Penetrating moisture may cause damage such as blistering in paints.
- Q-SUN
- The Q-SUN xenon arc tester reproduces the full spectrum of sunlight, including UV, visible and infrared. It is especially useful for testing dyes, pigments, textiles, inks and indoor materials. However, xenon arcs are inherently less stable than fluorescent lamps and water spray is less realistic than the QUV tester's condensation cycle.
- Full-spectrum sunlight: Xenon arc lamps produce the full spectrum of sunlight. With optical filters, the Q-SUN tester can reproduce daylight and sunlight through window glass exposure conditions.
- Humidity and moisture: The Q-SUN tester is excellent for light stability testing of humidity-sensitive materials such as textiles, inks, cosmetics and pharmaceuticals. With superior moisture dwell properties, it is also the only xenon tester suitable for accelerated 'Jacksonville' acid etch testing of automotive clearcoats.
- Q-Lab Outdoor Testing
- Q-Lab Arizona and Florida represent the world standards for sunlight and moisture. They allow the most realistic prediction of product performance. While some exposure tests can take years to complete, there are techniques that can be used to gain useful data in the short term.
- Natural Florida Weathering: Florida subtropical exposures have abundant sunlight, high temperatures and lots of moisture. Most materials should undergo natural Florida benchmark exposures. Even though natural tests can take several months or years to complete, results are the most realistic, and provide benchmark data for accelerated testing.
- Natural Arizona Weathering: Arizona desert exposures lack moisture, but have even more UV sunlight than Florida and extreme, fluctuating temperatures that may cause thermal shock.
- Q-TRAC Natural Sunlight Concentrator: In just one year, specimens can receive as much natural sunlight as 5 years in Florida.
This question sounds straightforward, but it is based on some erroneous assumptions. Generally the person asking this intends to take the light output of the testers (expressed in Langleys, joules, or Watts/m2) and divide it by the intensity of outdoor sunlight to get a magic factor for converting accelerated tester exposure hours into outdoor exposure years. Unfortunately, there is no mathematically valid way to make such a calculation, because it runs counter to the most basic principles of accelerated weathering. (Not to mention that, by definition, the Langley refers only to the sun and not to other light sources.) The result of such a calculation is at best meaningless, and at worst totally misleading.
One reason such a computation is invalid is that it ignores the effect of wavelength. What determines the amount of photodegradation is not the total light dosage in joules, but rather, how those joules are distributed with respect to wavelength. A joule of UV light (short wavelength), for instance, can be more damaging than a joule of visible or infrared light (longer wavelength), depending on the material you are testing.
In addition, the amount of UV in sunlight varies quite a bit, which can have a tremendous effect on the weathering of samples. Langleys and joules fail to reflect the wide variations in solar UV that occur from season to season, day to day and, in fact, hour to hour. For this reason, a number of studies have shown that in successive outdoor exposures where replicate samples received the same exposure in Langleys, there can be as much as a 7:1 variation in the amount of damage produced. In other words, the Langley is too inconsistent to be used as a standard measure of outdoor exposure. The conclusion is clear: the Langley may have valid uses, but certainly not in the field of laboratory weathering.
Even a measurement of Total UV (TUV), such as the 'UV Langley' or 'UV joule,' may be misleading because the same reasoning applies: within the UV, shorter wavelengths generally cause faster degradation to durable materials.
Here is an example of the wrong conclusions you can get from using Langleys, joules, or even TUV to evaluate accelerated weathering testers. The QUV tester can use two types of lamps: UV-A lamps with a peak emission at a wavelength of 340 nm, or UV-B lamps with a peak at 313 nm. The UV-A lamps produce more joules (and more UV joules) than the UV-B lamps, so isn't it reasonable to deduce that the UV-A lamps will produce faster degradation? Not always. Many materials will degrade slower with UV-A lamps because the UV they produce is longer wavelength UV. In the Q-SUN tester, you will find these same variations depending on the filters used.
Another reason you can't compare the light intensities of the Q-SUN or the QUV testers with sunlight is that such procedures completely ignore the effect of moisture. We find that for many materials, the effects of rain and dew are more important than the effects of sunlight. This is often true even for phenomena like gloss loss and color change, which are sometimes considered to be UV-induced changes. If you don't take moisture into account, you can't possibly come up with a magic conversion factor.
Finally, a conversion computation based on light intensity is invalid because it ignores the effect of temperature. It is possible to choose a wide range of temperatures in an accelerated tester, and it is possible to have a wide range of temperatures in outdoor exposure. Temperature has a profound effect on the speed of photodegradation. We observe in our accelerated testers that in some cases a 10°C increase in test temperature can double the speed of degradation.
For more information, see Q-Lab Corporation technical bulletin LU-8030, Errors Caused by Using Joules to Time Laboratory and Outdoor Exposure Tests.
See Technical Bulletin LU-0833 for more information.
The Big Payback on Weathering & Light Stability Testing: Quite often weathering and light stability testing yields huge returns on investment. Here are some of the returns you can get from a relatively modest outlay on testing.
Catastrophes Avoided: A new product or a reformulated product could fail very quickly when subject to sunlight and weather. The best protection against this is to test it before introduction. Even established products can fail if a production batch is made improperly or made with a bad shipment of some component material. What is the cost of a recall of a new product or a production batch that fails catastrophically in the field?
Big Savings on Material Costs: Maybe your product could be just as durable with less expensive materials – for instance a lower cost pigment, or the same pigment from a lower cost supplier. Maybe you could get the same performance with a reduced amount of some expensive additive. Or maybe a totally new polymer could lower your cost without hurting durability. The only way to know is to test. How much would a 1% savings on material cost be worth? What about 5%, or 10%?
Enter New Markets: To break into a new market you need to meet the customer's expectations for durability. You can hope that your product has the required durability, or you can test for it. If you find that your product's durability needs further development, you can use testing to improve it. You can re-design and re-test until you get the durability required to break into the market. What is the dollar value of being able to enter a new market?
Expand Existing Products: Even a relatively small change to a product, like a new color, can make a big difference in light stability. To take advantage of those small enhancements that can make a big difference to a product line, you need to evaluate the durability by testing it. What is it worth to extend your product line, without compromising durability?
Improve Product Durability: Frequently small changes in your materials can make big improvements in durability. Often our clients make dramatic improvements in durability without increasing their costs. The only way to do this is to test different materials and combinations of materials. What is it worth to have a more durable product?
Reduce Warranty Claims: How much are warranty claims costing you? How much could you save by reducing your warranty claim rate?
Verify Suppliers' Claims: Each of your suppliers truly believes that they have the best combination of cost and durability. And each of them is probably right - for some set of circumstances. How do you know if what is 'good enough' to your supplier is good enough for you? To find out which supplier is right for your particular requirement, you need to test your suppliers head to head, either in your own lab or at an independent third party like Q-Lab.
Expand Market Share: A more durable product can expand your market share at the expense of your competitors. However, you can't develop better durability unless you test durability.
Stay Ahead of Government Regulation: Environmental and safety regulations make it increasingly expensive to use many proven raw materials. And every year, even more materials become restricted. Redesigning with environmentally friendly materials is now a way of life. Some of these new materials won't compromise your durability, but some will. The only way to be sure is to test. How much can you save by picking materials that bypass costly regulations? How much would it cost if a new regulation forces you to use a substitute material with poor durability, or a material with high cost?
Outrun the Competition: The pace of innovation in materials keeps getting faster. Better and cheaper materials are introduced every day. If you don't take advantage of them, someone else will. The only way to evaluate these materials is to test them. What is the value of taking advantage of new materials before your competitors do? What is the cost of playing catch up?
Enhance Your Reputation: The products you sell now will affect your reputation far into the future. A premature field failure can haunt you for years to come. On the other hand, products with consistent durability will act as advertisements for your quality throughout their lifetime. An investment in durability testing can protect and enhance your reputation like few other investments. What is your good name worth to you?
Ensure Compliance With Durability Standards: Some customers require light stability test data as a pre-condition for buying your product. In that case you can't sell at all, until you produce test data either in your own lab, or in an independent contract testing lab.
This is a simple question, but unfortunately there is no simple answer. It is theoretically impossible to have a single magic number that you can multiply by weathering tester exposure hours to compute years of outdoor exposure. The problem is not that we just haven't developed the perfect weathering tester yet. No matter how sophisticated or expensive you make your weathering tester, you still won't find the magic factor. The biggest problem is the inherent variability and complexity of outdoor exposure situations.
The relationship between tester exposure and outdoor exposure depends on a number of variables, including:
- The geographical latitude of the exposure site (closer to the equator means more UV).
- Altitude (higher means more UV).
- Local geographical features, such as wind to dry the test samples, or the proximity of a body of water to promote dew formation.
- Random year-to-year variations in the weather, which can cause degradation to vary as much as 2:1 in successive years at the same location.
- Seasonal variations (i.e., winter exposure may be only 1/7th as severe as summer exposure).
- Orientation of the sample (5° South, vs. vertical North).
- Sample insulation (outdoor samples with insulated backing often degrade 50% faster than uninsulated samples).
- Operating cycle of the tester (hours of light and hours of wetness).
- Operating temperatures of the tester (hotter is faster).
- The particular material tested.
- The Spectral Power Distribution (SPD) of the laboratory light source.
Obviously, it is logically meaningless to talk about a conversion factor between hours of accelerated weathering and months of outdoor exposure. One is a constant condition, whereas the other is variable. Looking for a conversion factor requires pushing the data beyond the limits of its validity.
In other words: Weathering data is comparative data. Nevertheless, you still can get excellent durability data from accelerated weathering testers. But you must realize that the data you get is comparative data, not absolute data. The most you can ask from laboratory weathering are reliable indications of the relative ranking of a material's durability compared to other materials. In fact, the same thing can be said about Florida exposure tests. Nobody knows how a year in an outdoor 'Black Box' exposure at 5° South compares to a year on a house or a car. Even outdoor testing gives you only relative indications of actual service life.
Comparative data, however, can be very powerful. For instance, you might find that a slightly altered formulation has over twice the durability of your standard material. Or you might find that among several suppliers offering what look like identical materials, some fail very quickly, most fail in a medium length of time, and a few fail only after prolonged exposure. Or you might find that a less expensive formulation has equivalent durability to your standard material that has given acceptable performance over, say 5 years, of actual service.
Here is a good example of the power of comparative data. A coatings manufacturer was developing a new type of clear coating. Initial QUV tests caused severe cracking in 200 to 400 hours. This is much sooner than conventional coatings used for the same purpose. However, after 3 years of continual reformulation and retesting in the QUV tester, the coating was improved so that various formulations could withstand 2,000 to 4,000 hours in the QUV tester - much better than the conventional coatings. Subsequent parallel tests in Florida showed a similar 10:1 increase in durability. Yet if the coatings chemists had waited for the Florida data before changing their formulations, they would still be back in the early stages of reformulation, and the coating wouldn't be the commercial success that it now is.
On the other hand, if you still insist on a 'Rule of Thumb' conversion factor, find it empirically. Despite the impossibility of a universal conversion factor, hundreds of labs have successfully developed their own internal 'Rule of Thumb' for converting their Q-SUN or QUV tester hours into outdoor exposure hours. However, it is important to remember that these rules of thumb were developed from empirical comparisons of the lab's own accelerated tests with their own outdoor exposures. Furthermore,
the rule of thumb conversions are valid only for:
- The specific material tested.
- The specific set of lab tester time cycles and temperature.
- The specific outdoor exposure site and sample mounting procedure.
If you have outdoor experience with your materials, it shouldn't take more than a few months to develop your own rule of thumb. If you don't have experience with your own materials, it may be possible to work with competitive materials that do have a history of outdoor service.
Many labs have successfully developed their own 'Rule of Thumb' for converting Q-SUN or QUV tester hours into exposure hours.
In addition, it is important to remember: 'Correlation' means 'Rank Correlation.' When someone asks, 'How do the accelerated testers correlate with outdoors?' what they really should ask is 'How well do rankings of materials' durability in the accelerated testers duplicate the rankings of materials outdoors?' To measure rank correlation, we recommend Spearman's rho, a statistical measure that is easy to compute and which does not require the type of strong assumptions about the data that are required by linear correlation measures. A study of QUV tester and Florida durability rankings of 27 automotive coatings produced rank correlations of up to .89 between QUV tester rankings and Florida rankings. The rank correlation between different Florida exposures was .88 to .95. In other words, the QUV tester can reproduce Florida rankings almost as well as Florida can reproduce itself.
See Technical Bulletin LU-0833 for more information.
If you're almost ready to do some testing but you've never done this before and you're not sure how the process works, don't worry it's quite simple. There are a few important things to remember though to make it easier and get things rolling faster.
The first step is to contact us, and the telephone or email works equally well for a first time contact. The best number to call for new service is our Florida location at +1 (305) 245-5600 and let the receptionist know you want to discuss a new test. If you email us at q-lab@q-lab.com asking for a call back, there are a few bits of information that you can include which will help us prepare.
- What is your product, and what material is it made of.
- What is the end use and where is the expected usage location
- What is the anticipated time of durability and what are the expected failure modes
- What are your objectives from the testing
One of our customer service people will contact you back or will talk with you immediately, and our aim is to determine the best test method for your needs. During this discussion we will ask you some more questions such as:
- Are you testing to meet a specification or to improve durability
- What is your budget for testing
- What do you need to learn from the testing
- What time frame are you working within
We will run through the options available both for accelerated and outdoor testing, and together we will agree on which is the most suitable weathering test or tests for you. We will agree on the following specific items:
- Test method to use, and the type of exposure
- The quantity of specimens to test
- The dimensions of your specimens and their suitability for testing
- The type and frequency of evaluations or measurements
- The total duration of exposure and whether interim removals are needed
- How the test is going to be paid for
Once this is all gathered, someone at Q-Lab will prepare a cost estimate for you which will also include all the parameters of the test. This will confirm the testing that we will perform for you and give you an idea of the costs involved. If you need to, you may contact us again and revise the test program. We will issue you with a revised cost estimate and exposure analysis.
When everyone is agreed that the test program and costs are acceptable, you should now go ahead and send the specimens to Q-Lab. Typically you can send your test specimens directly to the test site location where the testing will take place. There are a couple of items you will need to include in the box of specimens, or you can provide them to us separately. We need a purchase order and a list of the specimens to be tested. We cannot start the checking in process until we have a purchase order or pre-payment for the test. We also need a full ID list, preferably in a spreadsheet, so that we can transfer the labels directly into our computer system. This speeds up the entire process and reduces the chance for errors. If you send us the test information separately, please put a cover letter or note in the box, so we can connect the specimens to an order.
The process of setting up the test is known as "checking in", and we may need to contact you during this phase if there is any missing information. Our goal is to get all test specimens exposed very soon after their arrival, provided we have all the necessary information, and a purchase order. Once the specimens are exposed, you will shortly thereafter receive an email from us with your user account and password for our customer web site at www.myweathertest.com You will be able to get all your test documentation and reports from this website
If you have any questions at any time during the set up of your test, you may call any of our customer service people in Florida, Arizona, or Ohio. Once the test has started you may contact either your customer service person, or talk directly to the lab technicians performing the test.
If you have any feedback for us regarding our service, please let us know. Or you can use the customer service feedback feature on our website.
Automotive exterior testing has been using back spray for years. It’s required in order to run SAE J2527, the performance-based replacement for SAE J1960. This is the only standard that we know about which requires this odd function. Although we do offer back spray as an option on our Q SUN Xe-3 and Xe-2 testers to meet this standard, one may still wonder: does the back spray function accomplish anything? Is it useful?
The answer to both questions is an unequivocal NO. Furthermore, back spray is counterproductive, since it wastes a lot of water and can at times even wash off specimen labels.
The back spray requirement in SAE J2527 provides a great example of the perils of hardware-based weathering standards. The original tester used in developing this standard was improperly set up for this back spray “feature” over 25 years ago, and its implementation via a hardware-based standard forced everyone to propagate this error. As a result, today we’re stuck with a standard that uses more than twice the water it should, can only be run in certain testers, and does not produce better results than front spray or condensation test procedures.
Weathering and corrosion test standards usually specify chamber set point conditions with a plus/minus tolerance. For example, ISO 4892-2 contains the following test parameter:
Black Standard Temperature: 65 ± 3°C
What this and other tolerances actually mean is that the tester’s irradiance, temperature, or humidity control system must be capable of maintaining stable conditions at a specified set point, which ASTM refers to as Operational Fluctuation. Typically, each test parameter is measured and controlled by a single sensor at a fixed location in the test chamber. The above example from ISO 4892-2, once chamber conditions have stabilized, the temperature of this single control set point should not rise to more than 68°C or fall below 62°C at any time.
Unfortunately, these tolerances are frequently misinterpreted. There are two important things to keep in mind that will help you from misinterpreting the intent of one of these set points:
- This does not indicate a uniformity requirement. When uniformity requirements do exist, they are much wider than operational fluctuation requirements.
- This does not allow the user to program the machine at any temperature to any value within the tolerance range. The tester should be programmed at the value stated.
QFS-40 and UVB-313EL lamps are both used in QUV accelerated weathering testers to provide fluorescent UV light that includes a significant UVB component for faster testing. The diagram below shows that both have similarly-shaped spectral power distributions. How do these lamps differ, and which one is best for use in your QUV?
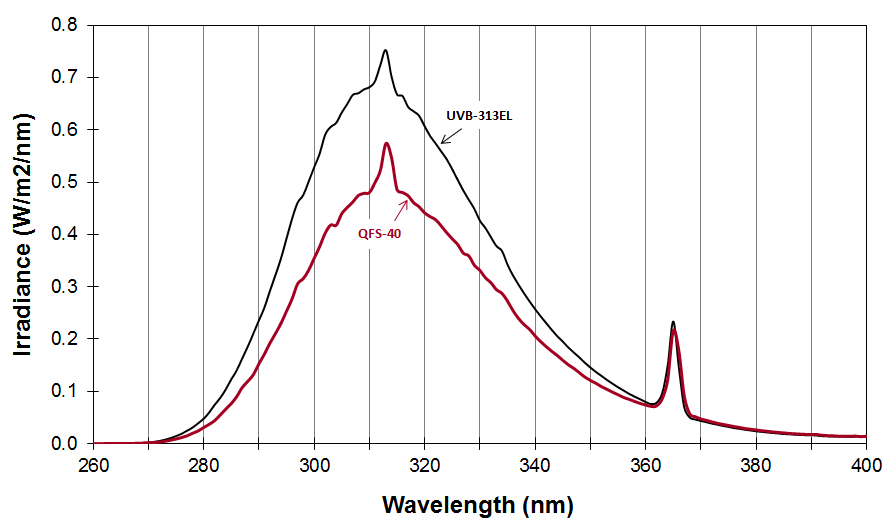
The QFS-40 lamp was developed to meet the specifications of SAE J2020, which, when written, had a hardware-specific requirement to use this lamp. That hardware-specific requirement has been removed in SAE J2020 and in most standards that are based on SAE J2020.
UVB-313EL lamps were developed later, and operate with the QUV’s SOLAR EYE irradiance control system to provide a more consistent and repeatable level of irradiance than using QFS-40 lamps in a QUV/basic, due to lamp aging, maintenance, and environmental conditions. UVB-313EL lamps are significantly less expensive than QFS40 lamps because far greater volumes of UBV-313EL are manufactured.
If your QUV has SOLAR EYE irradiance control, you should use UVB-313EL lamps and set the irradiance to 0.48 W/m2 at 310 nm for SAE J2020 and standards based on it, even if those standards have not been updated to include the UVB-313 lamp. This is the most cost-effective and best-performing option when irradiance control is available.
If your QUV does not have irradiance control (QUV/basic or old style models), you should continue to use QFS-40 lamps to maintain comparable irradiance levels to what is intended by a test standard or historical practice. UVB‑313EL lamps used in QUV testers without irradiance control will generate irradiance that is significantly higher than QFS-40 lamps in the same tester.
In Xenon and UV fluorescent accelerated weathering testing, an irradiance setpoint value is incomplete information without reference to the wavelength or wavelength range it represents. There are two classes of irradiance setpoints.
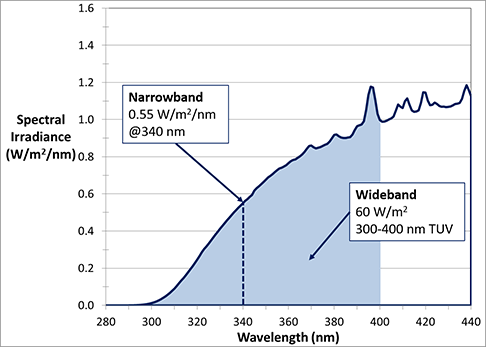
Narrowband irradiance setpoints include 340 nm and 420 nm, and represent a 1 nm wide bandpass, centered on the single wavelength value indicated (i.e. ½ nm on either side of 340 nm, for example). Narrowband irradiances use units of “Watts per square meter per nanometer.” This can be written as either W/(m2∙nm), W/m2/nm, or W∙m-2∙nm-1.
Wideband irradiance setpoints (usually “TUV” or “total UV”) are an integration of the irradiance from all wavelengths between two endpoints, usually 300-400 nm (accelerated laboratory) or 295-385 nm (outdoor). As a result, wideband irradiance values are generally much larger than narrowband irradiance values. Wideband irradiance is measured in “Watts per square meter,” written as W/m2 or W∙m-2.
The graph below is a spectral power distribution (SPD), which presents irradiance as a function of wavelength. This SPD shows that, for this particular light source, one could describe the irradiance either as having a narrowband irradiance of 0.35 W/m2/nm @ 340 nm, OR as a wideband irradiance of 40 W/m2 from 300-400 nm (TUV).
ISO and ASTM are the two major international standards bodies for weathering and corrosion testing. Although they use different terms and organize the documents somewhat differently, they share very similar structures, and most other standards bodies follow the guidelines for standards used by ISO or ASTM.
In ASTM, four types of standards are used commonly in weathering and corrosion testing. Other standards bodies use formats similar to ASTM, although the terminology they use may not be exact.
- AStandard Practicestandard states how you expose specimens to weathering/corrosion but not how long to run the test or how to evaluate the specimen after the test.
- AStandard Test Methodstates how long to run the test and/or how you evaluate specimens before/after testing, but usually does not give pass/fail criteria for the evaluation.
- AStandard Specificationstates how long to run a test and the pass/fail criteria for evaluations.
- AStandard Guideoffers a wide array of test methods and practices for a particular material/product.
ASTM, ISO, and other standards usually comprise the following sections:
- The Scope briefly describes the topics included in the standard to help readers determine if the standard may be applicable to them. It is very important when determining whether a test is used for quality control, qualification, or correlative testing.
- References includes any documents specifically cited elsewhere in the standard.
- The Principle or Summary of Practice summarizes how the test is performed.
- The Significance and Use or Introduction is a critical section that apprises readers of a standard’s limitations and utility.
- The Reagents or Test Solutions section describes any chemicals required for the test
- The Apparatus section describes the hardware options for running a test.
- The Procedure/Evaluations section explains the details of performing a Weathering and Corrosion test and how evaluations should be performed.
- Report, and Precision and Bias details the information that must be included in a test report along with real-world data demonstrating the repeatability and reproducibility of the test method.
- Annexes and Appendices include supplementary information on a standard that doesn’t really fit into the rest of the standard document. These can be mandatory or non-mandatory (see FAQ on standards language)
Standards are a very important part of most weathering and corrosion test programs. Unfortunately, it’s often very easy to misinterpret the intent of a standard because the difference between mandatory and non-mandatory statements is not always clear.
Mandatory statements include words like must, shall, or will in front of verbs. For example: from ASTM G154: “The light sourceshallbe fluorescent UV lamps.” This means that an incandescent light bulb can never be used in a test conducted to ASTM G154.
Non-mandatory statements include words like should, may or can in front of verbs, or include additional descriptive terms likepreferred, typical, suggested, or about. This kind of non-mandatory language means that section of the standard can be run a certain way, but it is not required. An example of this can be found in ISO 4892-1 in the section describing black standard thermometers: “A typical length and width is about 70 mm by 40 mm.” Use of the wordstypicalandaboutmeans the dimensions are non-mandatory because they are intentionally imprecise.
In addition to mandatory and non-mandatory language, there are a few other rules to keep in mind when reading standards. Different standards bodies use different conventions!
- Notes in ASTM and ISO standards are non-mandatory, unless the note is in a mandatory table
- In ASTM, Annexes are mandatory and Appendices are non-mandatory
- In ISO, Normative Annexes are mandatory and Informative Annexes are non-mandatory
In general, Q-Lab strongly recommends that you read standards in their entirety to try to understand not only the precise meaning, but also the intent of the writers in cases where the language is ambiguous.
This very common question is often well-meaning but can at times limit one’s understanding of weathering of materials. It’s like asking if someone is interested in a car or a vehicle - a car is a type of vehicle, but not every vehicle is a car. Likewise, color change is a type of polymer degradation, but not all polymer degradation is color change.
The general term polymer degradation refers to any change in properties—tensile strength, color, shape, etc.—of a polymer or polymer-based product, under the influence of one or more environmental factors such as heat, light, water and/or chemicals. Sometimes these changes in properties are also referred to as "aging". Various mechanisms, including photo-induced degradation, thermal degradation, and oxidation, can cause changes in strength, embrittlement, gloss, or any number of combinations of property changes.
Thus, rather than the narrow question “color change or polymer degradation?” a better question to ask oneself might be “What type of failures do my products typically experience in the field?” or “What modes of polymer degradation concern me the most?” The answers to these open-ended questions are more likely to lead to an effective weathering test program.
The most common Gravelometer test method is SAE J400, which has existed since 1968 and has not changed much over time. Q-Lab’s gravel, part number G-699, does meet the requirements of SAE J400. The standard says:
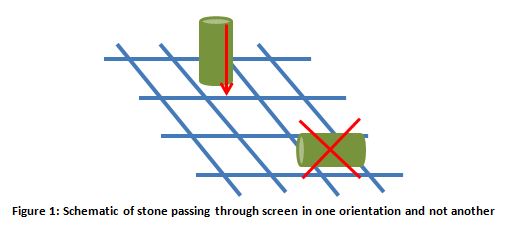
“The gravel for this test shall be water-worn road gravel, not crushed limestone or rock. The gravel will pass through 15.86 mm (5/8 in) space screen when graded, but be retained on 9.53 mm (3/8 in) space screen.”
The standard requires that the gravel be screened between screen sizes of 3/8” and 5/8” (9.53 15.86 mm). Individual stones from natural gravel are oblong, and thus some of them will pass through one of the screens if oriented in one direction but not fit through the screen if oriented in another direction (See Figure 1). What the standard actually means is that the largest stones will have at least one dimension <5/8” and that the smallest stones will have at least one dimension >3/8”.
Additionally, Q-Lab gravel meets the requirements JIS A 5001 #6 and #7 gravel. Even though this standard has nothing to do with Gravelometer testing, some Japanese automotive OEMs have test methods that refer to it. Q-Lab’s gravel is screened to meet the requirements of JIA A5001 #6 and #7.
Additionally, although the standard does list basalt, it is not required. Q-Lab gravel uses crushed granite, which is very similar to basalt in mineral composition. Therefore, Q-Lab gravel meets the size and material requirements of this standard.
Due to settling during shipping and storage, larger stones will rise to the top of a container, so we suggest that for any test you shake or mix up the container before testing!
In accelerated weathering testing, water is often the most difficult factor to accelerate. You cannot make water sit on a panel “faster” in a tester than in the real world. Since many materials outdoors will be wet for 8 to 12 hours a day, an accelerated test in many cases needs to simulate the same deep penetration of water into the material in order to correlate to real world conditions – and this means it has to be wet for a long time.
One way we can accelerate the effects of water is by increasing the temperature of the water. As the temperature increases, the air can hold more water vapor, which allows for increased water absorption into materials. Since condensation is formed from hot water vapor, the temperature of the water is easily controlled and the chamber can reach temperatures up to 60 °C. In contrast, it is difficult to run a water spray step in a Xenon Arc or Fluorescent UV tester while simultaneously maintaining high specimen temperatures, which is why water uptake is more difficult with spray than condensation.
But How “Wet” is a Condensation Step?
It’s hard to really appreciate how wet a condensation step is because it’s less obvious than looking at water spray. Figure 1 shows a set of seven pictures demonstrating how wet the first hour of a condensation step is.
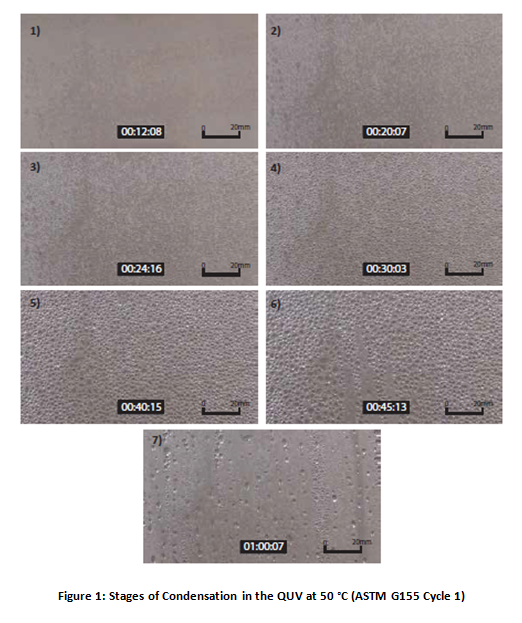
Once all of the initial droplets have run off the specimen, the cycle repeats with the formation of small droplets, those droplets getting larger, and those large droplets running off of the specimen. At any time 20 minutes or longer into the condensation cycle, the specimens are covered in water, and over the course of four hours, condensation is continually forming and dripping off of the specimens.
Most people would expect that weathering test specimens in a QUV condensation step are exposed to only a small amount of water. In reality, over four hours, a condensation step not only provides almost continuous exposure to aqueous water, but also elevates the temperature of the saturated air, exposing a specimen to a higher amount of water vapor. Unless you’re testing a thick, insulated material, hot condensation in a QUV tester is the best way to accelerate water uptake in a weathering test.
Weathering test standards often include guidance on repositioning of test specimens. This is the practice of moving specimens to different locations within a test chamber over the course of a test. Q Lab considers specimen repositioning a best practice when performing weathering testing, in order to ensure the most repeatable results regardless of chamber uniformity or tester type.
Repositioning in standards
Depending on the test standard, repositioning can be included as either a mandatory requirement, a recommended practice, or even something in between, where repositioning is mandatory only if certain uniformity conditions cannot be met. Over time the major lightfastness and weathering test standards have taken a more favorable view of specimen repositioning.
- ISO 105 B02, “Colour fastness to artificial light: Xenon arc fading lamp test,” published in 1984, offers a nonmandatory comment that repositioning is recommended.
- ASTM G151, “Standard Practice for Exposing Nonmetallic Materials in Accelerated Test Devices that Use Laboratory Light Sources,” published in 1997 and first revised in 2000, requires repositioning below 90% irradiance uniformity and recommends in all cases.
- ASTM D7869, “Standard Practice for Xenon Arc Exposure Test with Enhanced Light and Water Exposure for Transportation Coatings,” from 2013, always requires specimen repositioning.
Why does Q-Lab advocate specimen repositioning?
Q-Lab’s advocacy for specimen repositioning is supported by data. In a round robin study, documented in LX-5024 “Rotating and Static Xenon Testers Compared,” data was collected to demonstrate the differences in test uniformity with and without repositioning. Table 6 from that study, reproduced in a modified form below, demonstrates substantial improvement in test result uniformity with repositioning.
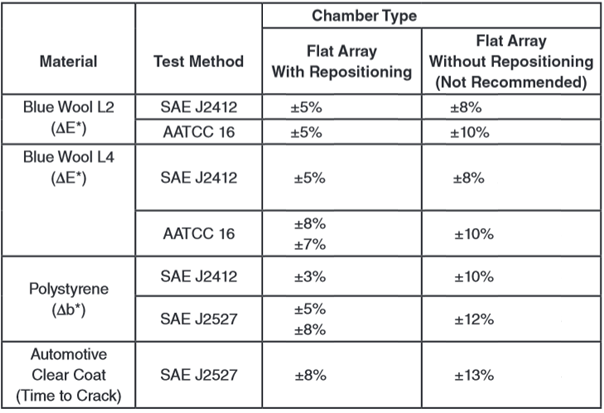
The language in test standards tends to have an improper focus on irradiance uniformity. Specimen repositioning is critical to improve testers’ delivery of all weathering factors, including water spray, humidity, and temperature. Therefore, in order to ensure optimum test repeatability, Q-Lab strongly supports specimen repositioning in all lightfastness and weathering tests.
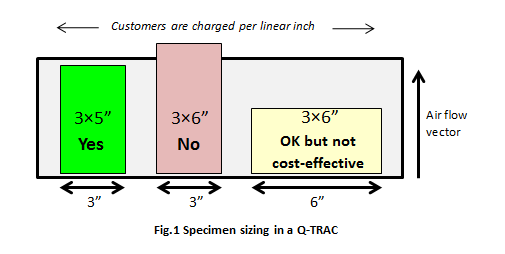
The Q-TRAC natural sunlight concentrator is a fast, powerful way to conduct accelerated lightfastness and weathering testing using actual sunlight instead of artificial sources. The Q TRAC system is useful for testing a range of products including coatings, plastics and reinforced plastics, automotive materials, building materials, textiles, inks, sealants, fluoropolymers, and geosynthetics. The geometry of the Q TRAC leads to these guidelines on optimal specimen sizing:
- A length no greater than 5.5”
- Uniform thickness, preferably ½” but no thicker than 1”
Any of Q-Lab’s -35 panels are ideally-sized for this test application.
Specimen length
Q-TRAC testing is purchased by how much length along the target board is used. The maximum specimen length that fits within the target board width (top to bottom on Fig. 1) is 5.5” (14 cm). Any specimen with a length greater than that must be oriented with that long dimension along the length of the target board, which decreases the cost-effectiveness of Q-TRAC testing.
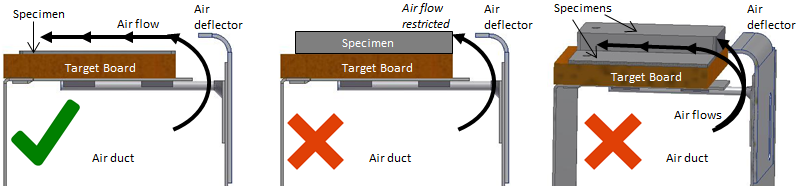
Specimen thickness
Q-TRAC customers also benefit from providing specimens with uniform thickness. Samples are cooled in a Q-TRAC by an air duct and an air deflector that is adjusted to provide proper air flow across the specimen faces. Specimens having uniform thickness, preferably up to ½” (1.27 cm) will receive maximum cooling (Fig. 2, left). Specimens with thickness greater than 1” (2.54 cm) or with variable thickness will receive inadequate cooling (Fig. 2, center and right).
Q-Lab strongly recommends regular calibration of irradiance sensors, black panel and chamber air temperature sensors, and relative humidity probes on our testers. This ensures the most consistent and accurate tester operation. Often, however, the term calibration is used when the proper term should be adjustment, or a combination of the two terms. The difference can be important for auditing and quality system purposes.
A calibration procedure is one that involves a comparison to a known measurement standard. Often that standard is traceable back to a national metrological institute, for example NIST in the United States. An adjustment, on the other hand, is a procedure wherein a change is made to a measuring system so that it outputs proper values of the quantity to be measured. Although their procedures are often performed together, one does not require the other. A simple example to understand this framework is setting your wristwatch.
1) You can compare the time on the watch to the official United States time at time.gov. If the watch reads 10:55 and time.gov says 11:00, then your watch has been compared to a known reference and shown to be 5 minutes slow. This is a calibration.
2) You may take a flight to a neighboring time zone and move your watch ahead one hour to compensate. This is an adjustment. No comparison to a known standard is involved, but this adjustment should get the watch closer to displaying the correct time.
3) You can compare the time on your watch to time.gov and then set your watch to match that time as closely as possible. This is both calibration and adjustment.
Q-Lab’s Universal Calibrator (UC) system makes use of both calibrations and adjustments. When you use a UC20 smart sensor, for example, to ensure correct lamp irradiance output every 500 hours in your Q SUN, that represents an adjustment of the Q-SUN’s irradiance measurement system. When Q-Lab compares output values from a new UC20 smart sensor to a NIST-traceable irradiance standard, that should be considered a calibration of the UC20, followed by an adjustment of the UC20 so it can provide the best possible readings when the device is sent to you.
A very common and fundamental question to ask when beginning a weathering and/or corrosion testing program:
“What kind of accelerated test should I run?” It’s a critical question to answer, but there isn’t one general answer that covers all customer situations. The matrix shown below illustrates four different “tiers” of accelerated weathering and corrosion testing. Each is distinguished by the type of information it delivers, typical length of testing, basis for comparison, and what kind of a research and development or certification program the test might be used for.
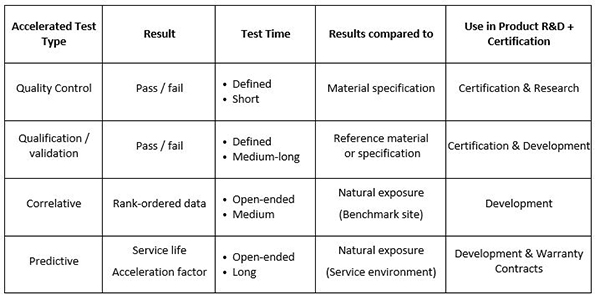
The
quality control and
qualification/validation tests give pass/fail data that is typically used as screening tools.
Correlative testing produces rank-ordered data that can be compared to outdoor results. Predictive testing can indicate material service life but is highly material-and service environment-specific. All of these tiers of testing serve as
directional decision-making tools – techniques to help customers make informed decisions on what materials and systems to pursue and how to lower the risk associated with those products.